Can you use a 60W/61W USB-C Charger on your 15-inch MacBook Pro that requires 85W/87W of power?

tl;dr Yes.

There is a lot of uncertainty when it comes to using a lower wattage charger to power or charge devices that draws a higher wattage. Some people claim it will fry your charger, others say it will fry your device. The trouble is that there is little authoritative guidance from Apple. Ask ten Apple Geniuses and you will get ten different answers.

Conventionally, it is OK to use a higher wattage charger to power a device that draws a lower wattage (e.g. using a 87W charger to charge a MacBook 12-inch that typically draws 29W), but not the other way around.

However, when it comes to USB-C, is there any difference? I recently got hold of the LG 27UD88. It is a nice 4K monitor that comes with USB-C connectivity. The neat thing about USB-C is that it can deliver video, data and even power over a single cable.

The 27UD88 supplies up to 60W of power, which can power and charge my 29W 12-inch MacBook without issue. However, my wife’s 15-inch MacBook Pro draws up to 85W of power and typically uses a 87W charger.

Since power delivery is not something that I can disable, I was worried something bad may happen when using the 15-inch MBP with the monitor.

It turns out though, Apple has given official guidance on using lower wattage USB-C charger to power the 15-inch MBP.

When Apple launched the MacBook Pro, they also collaborated with LG to launch two pricey monitors—the LG UltraFine 4K and 5K Display.

The 5K Display delivers 85W of power, but the 4K display only delivers 60W of power, like the 27UD88 that I’ve purchased. Since these monitors have been officially endorsed by Apple for use with the new MacBooks, I wondered what Apple had to say about using the LG UltraFine 4K with the 15-inch MacBook Pro.

According to Apple’s support document on the LG UltraFine 4K Display:

The LG UltraFine 4K Display provides up to 60W of power over USB-C and can fully power these Mac models using the included USB-C cable:

  • MacBook Pro (13-inch, 2016 and later)
  • MacBook (2015 and later)

The UltraFine 4K won’t fully power 15-inch MacBook Pro from 2016 and later, which requires 85W. If you try to power your 15-inch MacBook Pro through the display, your notebook’s battery will be utilized during times of heavy activity. To fully power your MacBook Pro and charge its battery, connect your 15-inch MacBook Pro to its Apple 87W USB-C power adapter when you use it with the UltraFine 4K.

So in short, you may experience your battery draining when using the 15-inch MacBook Pro with the LG 27UD88, but it won’t fry your MacBook Pro or the monitor.

I’d extrapolate that to say that it is OK to use the lower wattage 61W USB-C charger on your 15-inch MacBook Pro as well. If you have to, that is.
Buying a Second-Hand Mac

Look for something less than one-year-old so you have the chance to purchase AppleCare for the Mac. Caveat Emptor. If something does go wrong, you’re not going to be able to go after the seller. Your best bet is Apple.

The following is my checklist when buying a second-hand Mac. It’s meant to run through sequentially so that you can rule out listings without wasting too much of each other’s time. For example, if the price is not right, don’t bother asking the seller for more information.

Before You Even Meet The Seller…

  1. Ensure that the asking price is within your expectation, or negotiable if it’s not, before proceeding down the list. If it’s negotiable, do your homework to find out the average asking price for the same model of Mac. You may not want to start negotiating until you’ve gone through the remaining questions.
  2. See if the seller lists any physical defects. Scratches are fine for me; chips and dents usually indicate knocks and drops. I’d avoid them.
  3. If the seller doesn’t list any physical defects but a condition like 9/10, asks why the seller rated it 9 instead of 10.
  4. Ask whether the original receipts are still available, and if the seller will provide it to you on purchase. According to Apple, the AppleCare confirmation document and original sales receipt are required “if there is any question as to your product’s eligibility for coverage”.
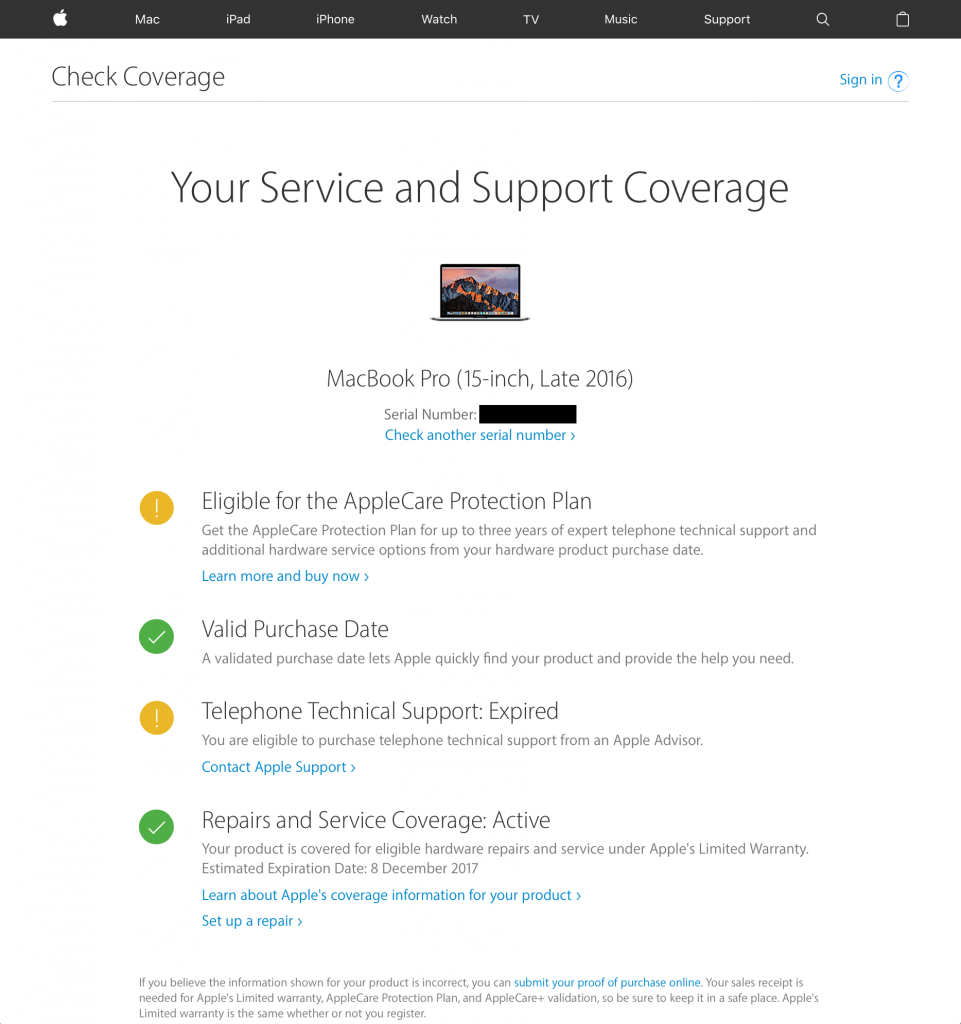
  5. Ask for the Mac hardware serial number and check it against Apple’s database to verify if it’s still under the one-year warranty, or if AppleCare has already been purchased for the Mac. Apple Service and Support Coverage
  6. If you’re buying a laptop, ask for the battery cycle count. Batteries have limited lifespan, and a laptop that needs to be tethered to power all the time is not useful. For a laptop less than a year old, you should look for something less than 100. Apple says its recent laptops have a maximum cycle count of 1,000; I’m not too sure about that.
  7. Ask if all original accessories (e.g. charger, keyboard, mouse, trackpad) will be provided. If the seller even has the box available, there is a good chance he took good care of the Mac.
  8. If everything is good, then ensure that the seller is agreeable for you to inspect the Mac for about 15 minutes before confirming the purchase. Arrange to meet at a location where you can do so. For a desktop, that probably means at the seller’s home where you can plug it in for testing.
  9. Many sellers protect their laptops with sleeves and screen protectors, I’d ask the seller to remove them before the meet-up if possible. If not, he should be prepared to remove it during the meet-up for inspection.

When You Meet The Seller…

  1. Check the Mac hardware serial number to make sure it tallies with what you were given before.
  2. Check the battery cycle count to make sure it tallies with what you were given before. The cycle count may increase by 1–2 if the seller continues to use the Mac.
  3. While you’re checking your battery cycle count, also ensure that the Condition listed under the Cycle Count is Normal.
  4. Open TextEdit in full screen and check the display for anything strange. Type on the keyboard to make sure it functions correctly.
  5. Bring a USB thumb drive to check that the USB ports are working. If you’re buying a recent Mac with USB-C ports only, then you’d need either a USB-C thumb drive or a USB-C to USB adapter.
  6. Check the iSight camera, microphone and speakers by recording a movie with QuickTime Player and playing it back.
  7. The final test before you hand over the money is to run Apple Diagnostics on the Mac. This will probably take a while. On a MacBook 2016, it took me less than 10 minutes.

And with luck, you’d bring home a good Mac while saving some money.

Locking focus and exposure on iOS5’s camera

Since the iPhone 3GS, you could tap on any part of the image in the Camera app to lock focus and exposure. The exposure and focus however shifts as you recompose your image.

New in iOS5, you can finally lock focus and exposure on a spot and keep it locked even as you recompose the frame. But it’s not entirely easy to figure out how.

Tap and hold on the spot for 2s until the focus box animates. The words ‘AE/AF Lock’ appears at the bottom of the screen as you let go of your finger.

Starting Objective-C for iOS development

Some people have been curious as to what are the resources that I’ve used to pick up Objective-C in a relatively short amount of time (about 3 months, including the time taken to develop and ship the first release of Due in September 2010). There are two books have been indispensable in my learning that I’d recommend to anyone picking up iOS development:

Programming in Objective-C 2.0 (3rd Edition) by Stephen G. Kochan

Best introduction to Objective-C. Mostly command-line (so it can be quite boring), but that takes away the distraction from learning the language as the learning curve is really steep (mostly in memory management). If you’ve some programming background, you don’t need to go through the entire book, and you’ll know which to skip.

iOS Programming: The Big Nerd Ranch Guide (2nd Edition)

This runs you through the graphical user interface development (the fun part) on the iPhone. But I really recommend to start with Kochan’s book first as the language learning curve is steep. Having the GUI stuff coming in can be even more confusing for someone new to programming or Objective-C.

Updated both title and and links with newer 2011 editions.

Numbers and Opt+Arrow Keys

Numbers hijack the Option+Arrow Keys by default

Numbers hijack the Option+Arrow Keys by default

If there’s a set of keyboard shortcuts you absolutely must know, it is the Command (⌘) + Arrow Keys and the Option (⌥) + Arrow Keys.

They are bread and butter when it comes to writing and editing long documents on the Mac, because they allow you to move your text insertion point (caret) around the document in a flash.

If you’re unfamiliar with them, here’s a description of what they do:

  • ⌘ + ←: moves caret to the start of the sentence
  • ⌘ + →: moves caret to the end of the sentence
  • ⌘ + ↑: moves caret to the start of the document/text box
  • ⌘ + ↓: moves caret to the end of the document/text box
  • ⌥ + ←: moves caret one word before
  • ⌥ + →: moves caret one word after

If you add the Shit Key to them (⇧), you could select say the last three words you were typing in record speed by holding down ⇧+⌥ and hitting ← three times. Select whole sentence from the end? ⇧ + ⌘ + ←

No more aiming your mouse cursor at the correct alphabet, clicking and dragging. Your hands will always be on the keyboard. Sounds good?

Now, most self-respecting Mac apps support this form of editing. Even your iPhone and iPad support all these shortcuts when you hook up your Bluetooth keyboard to it.

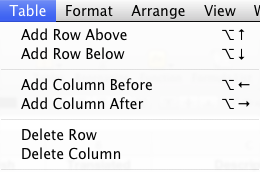
The problem comes in Numbers, the Excel equivalent made by Apple. By default, ⌥ + ← and ⌥ + → are mapped to insert new column to the left and right respectively.

As you can imagine, trying to move between words ends up inserting new columns (horrors), and that basically makes editing Numbers document super painful.

Fixing the Add Column on Opt+Arrow Key Problem

Fixing the Add Column on Opt+Arrow Key Problem

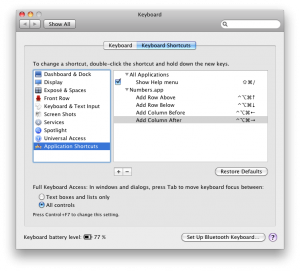
Thankfully, you can change all that easily on the Mac by mapping the add-columns shortcuts to another set of keys from within System Preferences > Keyboard > Keyboard Shortcuts.

Since I don’t really need to add columns as frequently as I need to move around various parts of the spreadsheet quickly, I’ve since mapped them to a more obscure key combination involving Control (^) + Option (⌥) + Command (⌘) + Arrow key.

This restores my sanity when it comes to editing Numbers document, which I’ve been working on a lot when collaborating with my translators for my iPhone reminder app—Due.

Safari: Open all “new window” links in tabs, and other tips to replace Saft

Predictably, my Leopard copy of Saft no longer works on Snow Leopard. A new version was released today but it does not support native 64-bit mode Safari under Snow Leopard. There’s currently no upgrade option for Leopard users to Snow Leopard versions of Saft, and I’m not keen on paying the full US$15 for a version that does not work with 64-bit Safari in Snow Leopard.

This is not the same as making links that opens a new window to open in a tab

This is not the same as making links that opens a new window to open in a tab

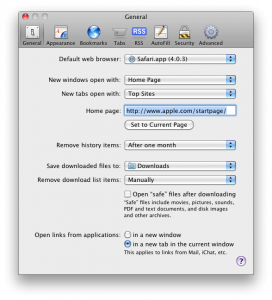
There are a few things I truly missed from Saft, including making those pesky links that force open in new windows to open in tabs instead. Note that this is different from the option under Safari’s Preferences > General to “Open links from applications: in a new tab in the current window”.

For example, my university’s (NTU) website has a habit of irritating the hell out of us by opening just about everything in a new window. Try it, search for something, boom, a new window appears. Click on the link to the library’s page, and boom, a new window opens.

Fortunately, this can be dealt with without paying for or installing any additional software. You just need to quit Safari totally (Cmd+Q), open up Terminal from Appplications/Utilities, and key in the following:

defaults write com.apple.Safari TargetedClicksCreateTabs -bool true

Launch Safari again, and no new windows shall ever bother you again. Meanwhile, I’m still missing the following features that I’ve grown to depend on from Saft:

  1. autosave-last-viewed-websites-on-quit-and-restore-on-startup. To be fair, you can get around this by going to History menu > Reopen All Windows from Last Session, though you would have to do this every time you launch Safari,
  2. undo when you accidentally closed a tab or page (no workaround now),
  3. drag scroll a page by holding down the Control key and flicking the mouse (something I got too used to and it’s bugging me that I can’t do it now).
  4. type ahead search

Thailand Reloaded

Back in Thailand again, a good break from all the nonsense that’s happening in Singapore.

If you’re looking for prepaid SIM for your iPhone, Blackberry and Android in Thailand, TrueMove operator offers unlimited mobile broadband over EDGE for just 250 baht (S$11). Compared with the per-minute data plan offered by most operators (AIS, dtac), this is a steal. What sense does it make for a 10-hour data plan on an iPhone that is connected every second anyway? Half a day of use?

If you’re travelling with a group of friends, TrueMove to TrueMove calls within Thailand are half a baht per minute; cheaper than the one baht per minute rate by other operators. Initial SIM Card charge is 49 baht; 50 baht (S$2) cheaper than it’s competitors.

The catch is that while other operators offer a flat rate of one baht per minute for all local calls, TrueMove rates are slightly more expensive at 1.5 baht per minute for TrueMove to other telco calls within Thailand. So if you’re expected to make a lot of local calls to people on other telcos, then the initial savings for your SIM card would quickly be offset.

But if data plan is most important to you, can’t beat the unlimited data for 250 baht on TrueMove.